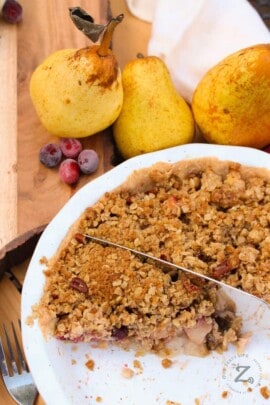
Healthy and wholesome pear crisp is so easy to make, that even the kids can help out!
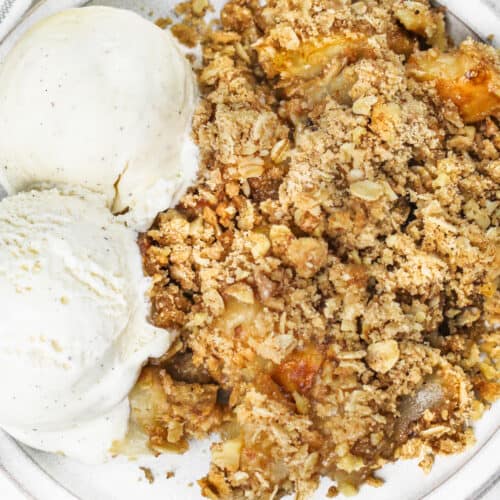
Sliced pears are tossed in sweetened flour and baked under a crispy topping made with oatmeal, brown sugar, and fragrant Fall spices.
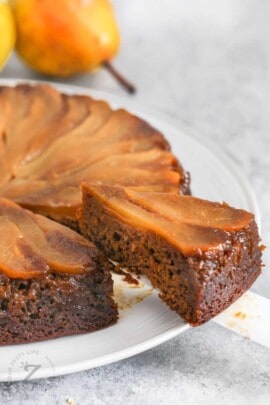
Serve this sweet treat warm with a scoop of vanilla ice cream for pure flavor bliss!

Pear Crisp Perfection
- Late summer and all through Fall, this pear crisp recipe is a seasonal favorite with everyone and makes holiday baking a breeze!
- Homemade pear crisp is a cinch for new-ish bakers because the pears create a sweet sauce with the sugar and flour as they bake. Best of all, there are no complicated prep steps and no pie crusts to make!
- For a festive holiday dessert, make pear crisp with fresh or frozen cranberries or some cut up caramel candies mixed in with the pears.
Crisp vs Cobbler
As a general rule, crisps are made with an oat streusel topping while cobblers have a biscuit or pie dough topping.

Ingredients and Variations
Pears: Choose pears that are heavy, firm, with unblemished skins and a sweet smell. Anjou, Asian, and Bosc pears are perfect because they stay firm after being cooked. Thaw frozen pears before using and drain and pat dry canned pears.
Flour: Switch out the white flour for your favorite gluten-free blend for both the pear mix and the topping, if desired.
Topping: Rolled oats are preferable because they bake up nice and crunchy in the butter and brown sugar! In addition to the cinnamon and ginger, feel free to add allspice, nutmeg, or a pinch of cloves for an extra fragrant dessert! This DIY apple spice blend can be used in all your Fall and holiday baking! Make it extra healthy and add some walnuts, pecans, pumpkin, or hemp seeds, or your favorite granola.
Variations: Switch out the pears for apples, peaches, rhubarb, or blueberries!


How to Make Pear Crisp
No need to peel pears for this easy recipe!
- Toss pears in a bowl with vanilla, flour, and sugar. Place the pears in a baking dish, as directed in the recipe below.
- Mix the oats, brown sugar, flour, and spices in a bowl. Cut in the butter until the mixture is crumbly. Add nuts if using.
- Sprinkle topping over the pears and bake until the pears are cooked through and the topping is lightly browned.
- Let set about 5 minutes before serving.


Storing Pear Crisp
- Budget-friendly pear crisp uses ingredients likely already in the pantry and can be prepped ahead and baked just before serving.
- Keep leftover pear crisp covered in the refrigerator for up to 4 days. Enjoy it cold or reheat portions in the microwave.
- Freeze pear crisp either before or after baking! Freeze it in a covered container for up to 6 months and allow it to thaw overnight in the refrigerator before baking or reheating.

More Recipes with Pears
Have you tried this Pear Crisp recipe? Leave a comment and rating below!
Pear Crisp
Equipment
Ingredients
Crisp Topping:
- ½ cup old fashioned oats (rolled oats)
- ½ cup brown sugar
- ½ cup all purpose flour
- ½ teaspoon cinnamon
- ¼ teaspoon ground nutmeg or ginger
- ¼ cup butter
- ¼ cup chopped walnuts or your favorite nut or coconut (optional)
Instructions
- Preheat oven to 375˚F. If desired, lightly grease an 8 inch (2 quart) square baking dish.
- Peel pears if desired. Core pears and dice.
- To a large bowl, add pears and sprinkle with vanilla, flour, and sugar. Gently toss to combine. Add to the baking dish.
- In a medium bowl, mix together oats, brown sugar, flour, cinnamon, and nutmeg. Using a pastry cutter or fork, cut in butter until mixture is crumbly. Stir in nuts if using. Sprinkle over pears and lightly smooth the topping.
- Bake for 25-35 minutes (40 minutes for thawed fruit) or until fruit is cooked through and topping is lightly browned.
- Serve warm or at room temperature. Serve with ice cream or whipped cream if desired.
Notes
- Pear crisp will keep in the refrigerator for 4 days and in the freezer for 6 months.
Nutrition Information
Nutrition information does not include optional ingredients or garnish and is an estimate. It may change based on actual ingredients and cooking methods used.
©Our Zesty Life. Content and photographs are copyright protected. Sharing of this recipe is both encouraged and appreciated. Copying and/or pasting full recipes to any social media is strictly prohibited.
Like our recipes?
Follow us on Pinterest!